RV Pioneers team works to help you understand the most important things about RV life. Before you leave the blog you can feel confident about getting started.
Airstreams are the high-end joy of the RV world. They’re made from aluminum and shiny as ever (when new). Aluminum forms aluminum oxide, or oxidation, when it interacts with the air. Aluminum, unlike steel, does not rust when it oxidizes to create iron oxide. The chemical interaction between aluminum and oxygen does not eat away at the metal; instead, it builds upon it, darkening it. This creates the beauty and shines that airstreams are known for.
That’s the chemical side of the tale, but it’s not the part that got you to the polishing stage. This is most certainly an emotional decision. It’s challenging to look at airstreams or aluminum the same way after seeing one that’s been freshly polished. That classic sleek shape’s mirror finish is stunning.
This article explains how to clean an Airstream in basic terms. But first, you should understand that polishing isn’t for everyone. It’s not the same for every airstream. There are many different makes and models, ones that can be polished and ones that simply won’t look good, so can your airstream be polished?
All Airstreams can be buffed to a high sheen. However, not every trailer can match the classic airstream’s eye-catching mirror appearance. The greater the shine, the softer the aluminum alloy (, the higher the aluminum content).
Until 1982, Airstreams were made of thick aircraft-grade aluminum with a pure aluminum coating on both sides. The aluminum beneath the cladding was robust, and it is this that gives the trailer its strength. The pure aluminum cladding is what makes it sparkle so brightly when polished.
Airstream utilized these panels into the 1980s, whereas some travel trailer makers only used them until the early 1960s. Airstream began using thinner aluminum on trailers in the middle of 1982. Because this alloy is significantly softer than the others, it requires a thicker coating. However, due to its soft nature, it may still be polished to a high sheen. It won’t have the same mirror as an earlier trailer if it doesn’t have the pure aluminum coating.
Airstream dealers began providing an early form of plasticoat on a few trailers as early as 1958 to prevent oxidation. In 1961, it was made an official option to add to your trailer for a fee. It became standard on all Airstream trailers in 1964.
Over the years, the recipe has evolved numerous times, with certain forms surviving longer than others. However, when the metal expands and shrinks with the heat of the day and the UV rays dry up the coating, making it brittle, they ultimately collapse and flake off, like a sunburn. It usually peels first at the top and moves to the sides.
A former owner of your trailer may have fought with this issue and had the trailer re-plastic coated. They may have let the plasticoat peel off entirely or simply let time take its course and watched as most of the plasticoat vanished.
If your trailer has any plasticoat on it, it must be removed entirely from the places you wish to polish, regardless of how old it is. This page includes instructions for identifying whether your trailer still has a plasticoat and removing it.
Should I Polish?
Polishing is a time-consuming process. The amount of time it takes is determined by the trailer’s size, the quantity of oxidation, the effectiveness of your approach, and the number of breaks required (in my opinion, the more breaks, the better). Expect to work on this project for at least three days at a minimum. If you need to remove a plasticoat, add a weekend to your schedule. It’s not unusual for the job to take twice as long as you think it should.
The good news is that once a trailer has been polished to a mirror finish, polishing it again takes a fraction of the time. That’s essential to know since you might have to repolish every year to retain the shine. Because the aluminum surface gets smoother and more “healed” with each polishing, subsequent polishing will be easier, and the sheen will stay longer once polished.
To grasp the smoothing and healing process, consider that aircraft-grade aluminum polishes, such as Airbrite or Nuvite, remove oxidation by an abrasive process rather than a chemical one. Aircraft-grade polishes are meant to be applied in stages, similar to sandpaper. Each succeeding stage polishes the surface more finely. On heavily oxidized or somewhat corroded surfaces, coarser polishes are employed. After virtually all rust has been eliminated, the best polishes are applied.
Your airstream’s skin is covered in tiny and microscopic scratches, pits, and other flaws. Because the surface area is decreased during polishing, there is less chance to oxidize the surface.
Furthermore, oxidation left on and in a polished surface promotes the growth of additional oxidation, making the polish job dull faster. The longer the polish process lasts, the cleaner the oxidized surface is.
Is polishing something you’d want to do? This article will assist you in determining the amount of work required. The worth to you must be balanced against your skill and willingness to complete the task. I know some of you proud airstream owners will polish your trailer at any cost!
The Process
The following polishing processes were created based on my own testing and input from airstreams owners who have experimented with numerous polishing techniques.
Polishing methods are constantly evolving. Although I can propose the following techniques confidently, they are not the only approach to good outcomes. If you have the time, I encourage you to try other methods.
What do you need?
The aggressiveness of polish is determined by the polishing pads or cloth used. To complete the task, you’ll need a variable speed rotary polisher as well as a Cyclo dual-head orbital polisher. Rotary polishers come in a variety of brands. Look for a heavy-duty 7″ variable speed type that can run at 1500 rpm. The DeWalt DWP849 is an excellent choice.
You’ll need the following pads and other things, in addition to the two power tools:
5+ 7″ twisted-wool polishing pads
Pads are held in place by a 7″ velcro backplate.
A polishing pad cleaner with a “spur.”
Pads of cyclo foam for backing Bonnets made of cyclo cotton terry OR many yards of heavy cotton fabric (I recommend a lot of 95% cotton thrift store t-shirts)
A Ladder for safe work on the trailer’s side and top
Soft cotton rag
Mineral spirits
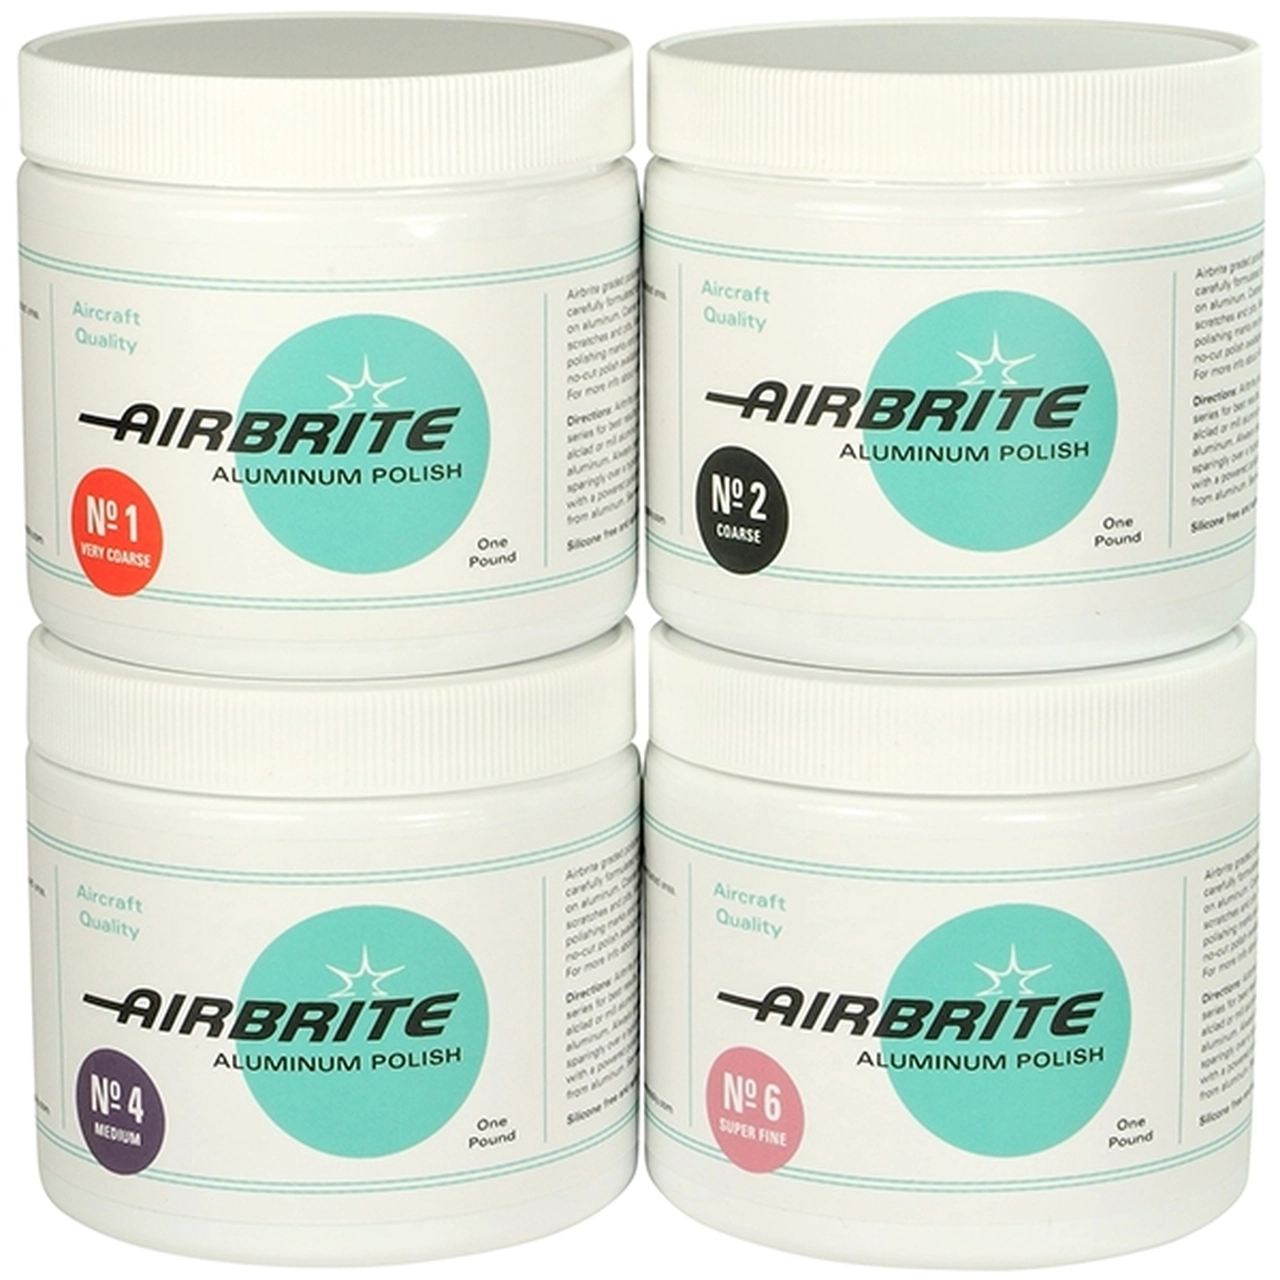
Airbrite, Nuvite, or other aviation polishes
Step 1: Remove all Damageable Parts
The porch, tail, and marker light lenses should be removed. Any other plastic or painted pieces that might be harmed during polishing should be taped off or removed.
Glass windows are safe, but plastic vent covers can discolor or get damaged. Polishing is safe for door and window gaskets; however, they should be covered during plasticoat removal (if applicable).
Step 2: Do a basic clean
Oils and waxes will obstruct proper polishing. To properly clean your trailer, use a soft wool vehicle wash glove and warm soapy water (dishwashing liquid is OK in this case). If you notice any bird droppings, tar, or pine sap on the trailer, use mineral spirits or more strong solvents to remove them. Pick any dried loose caulk out of the seams using hard plastic or wooden tool.
When you’re through washing and preparing, make sure the surface is immaculate. Any dirt, sand, or grit remaining on the trailer can produce highly damaging scratches in the trailer skin when you begin polishing. Please keep in mind that any cleaning product containing ammonia should be avoided.
Step 3: Remove Plasticoat
Before a trailer can be polished, all traces of a plasticoat must be eliminated. There are numerous techniques to determine whether or not your camper has a plasticoat. First, examine your trailer from a distance. Does it appear to have a sunburn on top? Are there noticeable splotches of darker oxidized metal?
Then the remainder of the trailer seems to be in satisfactory condition? If this is the case, you have a plasticoat, and the top has failed. This is understandable given that the top of the trailer receives far more sunlight and heat than the remainder of the shell.
If you need to remove the plasticoat, use either paint remover or lacquer stripper. This is similar to removing a finish from hardwood furniture. Don’t use any steel wool, green plastic scrub pads, or sandpaper, of course.
We recommend utilizing a paint remover intended for stripping paint from metal that is safe for the environment. It should be safe to work with and may be hosed off without damaging the grass or the groundwater. Typically, one or two liters is plenty for the task but test a small area first.
On a hot day, park your airstream in the shade before applying the stripper. Apply the stripper to one or two trailer panels. Follow the guidelines on the container, allowing it to sit for a long time until the plasticoat dissolves. Use the tips of a wide house painting brush to work it about to loosen the plasticoat before hosing it off. They’re gentle and won’t irritate your skin. You may also use a putty knife, spatula, or scraper made of plastic. If any coating remains, you may need to reapply the remover. When you’ve stripped your trailer completely, clean it thoroughly according to the directions in Step 2.
Get Rid of the Oxidation
Begin here if your trailer is heavily oxidized (as all airstreams are if they haven’t been polished in several years). You’ll need a coarse polish and a 7″ rotary polisher with a fresh or clean wool compounding pad for this stage.
Place one finger across the top surface of the polish, barely soaking your finger with polish. Place a wet “fingerprint” every 3″ or so across a 3 to 4 square foot area to be polished. Work rapidly to prevent the polish from drying out.
Before using the polisher, place the wool compounding pad on the “fingerprinted” region and distribute the polish around. Tilt the pad up slightly so that it is not resting flat while it rotates, but rather that only one side of the pad is in contact with the surface. The polisher should be operated slowly. Move the polisher over the surface at a speed of roughly a foot every one to two seconds while it rotates. All that is required is light but consistent pressure.
To integrate lightly scratched regions, go back and forth, up and down, then diagonally over the scratched area multiple times. Do not stop moving the pad and “bear down” on one spot to merge the scratch. It can cause the surface to get overheated and burn.
The black residue will develop over the buffing area as you go back and forth. Continue sliding the buffer back and forth across the surface, up and down. Suppose you have the proper quantity of polish. In that case, the black residue will begin to lighten and vanish after approximately 30 to 45 seconds.
Continue going over the area until the black residue has disappeared and the clean aluminum surface is visible. Black residue may linger around the edges of your buffed region, but this will be cleaned when you go on to the next adjacent area to be buffed. If further work is required to eliminate the cloudiness or the scratches remain visible, repeat the method described above.
Repeat the preceding procedures on the next nearby section, and so on, until the entire panel. Eventually, the whole trailer is finished.
The wool compounding pad will mat up as you proceed. It will seem glossy as a result of the oxide and polish. When this occurs, fluff the pad’s pile by “spurring” it with a buffing spur. Spurring loosens the matted fibers, allowing you to use the pad for extended periods before switching to a clean pad.
The oxidation removal stage will leave you with bright metal and very little oxidation. Still, there will be noticeable swirl lines from the pad and the relatively coarse polish employed. They will be deleted in the following phase.
Now Polish
You may be allowed to begin this step after Step 4 or if your trailer has been polished within the last three or four years.
Repeat the technique outlined in Step 4 over the whole trailer using a medium abrasive polish like Airbrite No.4 or Nuvite Grade C and your 7″ polisher with clean or new compounded pads.
After polishing the whole trailer, hand wipes it down with a clean cotton terry towel, diaper cloth, or similar fabric to remove any surface polish. Look for residue accumulations around rivet heads and along panel lines. To remove tough deposits, mineral spirits might be used.
All apparent oxidation will be removed after this polishing stage, and your trailer will be nicely shined. You may decide that you do not wish to go to Step 6. That is certainly an option but bear in mind that the smoother the surface, the longer your polishing work will endure.
The Big Finale
Switch to the Cyclo dual-head orbital polisher for this stage. You’ll be using a “no-cut” polish, such as Airbrite No.6 or Nuvite S.
The Cyclo can be used in two ways. One method is to polish the Cyclo heads with cotton terry bonnets (over foam pads), much as you would a vehicle. This creates light swirl markings. They’ll be considerably smaller and lighter than if you stopped at Step 5, but they’ll be visible in bright sunshine. The other approach is more inconvenient, but it totally eliminates the swirl marks. This approach makes use of Cyclo’s unpredictable, vibrating action rather than its spinning.
Cover the heads with 95 percent + sweatshirt fabric, soft 100 percent cotton flannel, or thick 100 percent cotton T-shirt fabric to minimize whirl. Wrap a strip of cloth across the face of the foam polisher pads, being careful not to impede the motor vent holes. The fabric size does not have to be perfect, but a 30″ by 40″ piece works nicely.
Run one finger across the top of the jar of polish and place a wet fingerprint about half a finger length every 6″ or so over a 3 to 4 square foot area to be polished. (Note that less polish is used in this stage than in prior steps.)
Pull the fabric tightly over the face of the polisher and hold it in place with your hand while gripping the polisher handholds. You’ll be bunching it up and twisting it as you try to keep everything with one hand. To hold it, some individuals employ a ratcheting plastic cable clamp. The cloth should enable the heads to rotate and vibrate beneath it without grasping it.
Smear the face of the polisher around the area to be polished, then turn it on and move the polisher over the area slowly. Only apply mild pressure.
Back and forth and up and down with the polisher. If required, go over the areas surrounding elevated rivets and panel lines again. As previously, black residue will develop.
As you continue rubbing over the area, the black residue will begin to vanish after 30 to 45 seconds, and the dazzling mirror sheen will appear. Work your way back over rivets and panel lines to remove as much residue as possible.
Stop the polisher when the region is free of surface polish. Adjust the fabric positioning on the Cyclo so a clean cloth area is over the head. Once again, Buff, the entire area polishes and brightens the surface and clears up any light residue trapped around rivets and panel lines.
Finish by hand using a clean microfiber towel or flannel, gently scrubbing around rivet heads. Avoid dragging any deposited polish onto the clean, crisp, polished panel picture.
Seal it!
Unless you want to hire a professional to plasticoat your trailer right away, you’ll need to plan for reoxidation in the months and years future. The slower the reoxidation, the better your polishing job. However, regardless of how good you did, your trailer will reoxidize over time.
Applying a sealer, such as a sort used after washing a car, is one technique to halt the reoxidation. Airstream utilized glass wax in the past. Glass in its original formulation is no longer accessible. Some individuals still use vehicle wax, while others use a non-wax polymer sealer designed for automobiles or boats.
Any sealant application is contentious. Those who dislike it claim that it does nothing to slow reoxidation and marginally dulls the mirror shine. It will also need to be removed before repolishing.
If you use a sealant, you may expect it to delay reoxidation for another six months.
Re-polishing?
The rate of reoxidation varies depending on how well the metal has healed and environmental factors such as sunshine, pollution, and humidity.
To keep your trailer looking excellent, you should repolish it once a year. Fortunately, the yearly touch-up may be completed fast because just Steps 2 and 6 may be required. Step 5 may be necessary for some instances.
The Walbernize Rn Super Seal is the ideal product used after polishing your airstream. This wax is a seal that is safe for acrylic, fiberglass, and urethane finishes. This product protects new paint, removes oxidized pigment, traffic film, and spots of road oil and tar. It creates a beautiful waterproof finish, made to protect your airstream.
Hex-Logic makes twisted wool polishing pads made to polish almost any surface, but ideal for airstreams. Traditional foam polishing pads have a flat face and a square profile, and this out-of-date design makes it difficult for them to bend and adapt to curves, contours, and other basic shapes present on all airstreams.
To attach to any machine polisher backing plate that employs hook-and-loop material, each pad has a hook-and-loop interface backing pad. Through the attachment side and sophisticated ventilated backing plates, this unique breathable backing material helps drain heat away.
An airplane-grade sealant and polish, Airbrite is a top-of-the-line material. There are six different cuts each for different grades of aluminum so make sure you understand your airstream before buying this product.
Conclusion
If you finished this project using this guide, congrats! I wrote this with as much detail as possible, so it would be easy to follow! If you’re still in the process or still thinking about starting, do it! As difficult as it sounds, once you start polishing, it’s a straightforward process.
Just remember, once you polish your airstream for the first time, it will just get easier each time after!
About Latest Posts RV Pioneers TeamRV Pioneers team works to help you understand the most important things about RV life. Before you leave the blog you can feel confident about getting started. Latest posts by RV Pioneers Team (see all) When is the Best Time to Buy an RV? – June 12, 2024 How to…
New Zealand is a top tourist destination–one that already enjoyed popularity as home to the set of the multi-billion-dollar Lord of the Rings franchise–and still climbing, with a record 3.82 million visitors in 2018. And for some, the best way to experience New Zealand and beyond is nothing utter than an RV, equipped with quality material for a sturdy ceiling.
If you own an RV for travel, it’s likely you need a power cord. You could boondock and use your generator or solar panels for the week, but it’s much more convenient to have full hookups.
However, one of the most important things you can do before you hook up is to figure out the type of power cord you need. It can prevent fire or damage to your RV. If you need a 30-amp RV plug for your rig, here are some of the best you can buy.
Choosing a 30 Amp Plug
There are 30-amp plugs and 50-amp plugs. Generally, larger RVs have 50 amp plugs because they have more things they need to power. They may have multiple air conditioners, residential refrigerators, and larger appliances.
If you’re looking for a 30-amp plug, it’s likely you’ll have an easier time finding what you need at an affordable price. They’re
About Latest Posts RV Pioneers TeamRV Pioneers team works to help you understand the most important things about RV life. Before you leave the blog you can feel confident about getting started. Latest posts by RV Pioneers Team (see all) When is the Best Time to Buy an RV? – June 12, 2024 How to…
About Latest Posts RV Pioneers TeamRV Pioneers team works to help you understand the most important things about RV life. Before you leave the blog you can feel confident about getting started. Latest posts by RV Pioneers Team (see all) When is the Best Time to Buy an RV? – June 12, 2024 How to…
About Latest Posts RV Pioneers TeamRV Pioneers team works to help you understand the most important things about RV life. Before you leave the blog you can feel confident about getting started. Latest posts by RV Pioneers Team (see all) When is the Best Time to Buy an RV? – June 12, 2024 How to…