A Guide to RV Plumbing – Everything You Need To Know
When it comes to RV life, one of the most important things to understand is how the plumbing works. If you’ve bought an RV with the plumbing already installed, you may think that you’re all set. However, it’s good to know what each part does and how the system works, in case something goes wrong somewhere along the line so that’s why we created this guide to RV plumbing. If you are an RV owner, it’s essential to know where everything is because you’ll need to maintain the as you go along and maybe even learn a little .
You may be renovating an RV and rebuilding it from scratch. In which case, installing the RV’s plumbing system is going to be one of the biggest and most time-consuming tasks.
If it seems a bit overwhelming, then don’t worry – we’re here to help. We’ll explain everything you need to know about RV plumbing – it may not be the most glamorous subject, but you’ll be glad to know about it if something goes wrong!
Bottomline Upfront
The most important thing you can do for your RV plumbing is to keep your gray and blank tank cleaned. The blank tank can be extra annoying, however, you shouldn’t ignore it. Keep treatments going and keep things flowing if you want to save yourself a lot of heartaches.
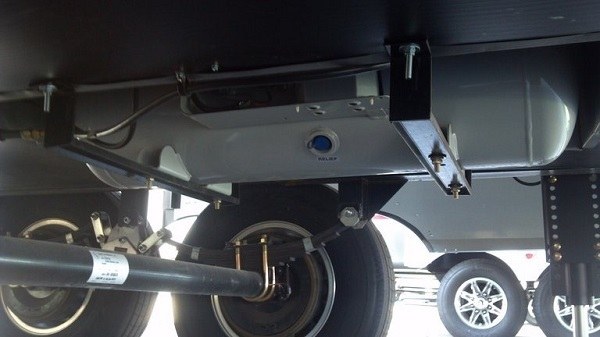
Basement Area
The basement area of your RV is a great storage space. You can usually access it from the side of your RV by opening a series of doors. This tends to be where your water tanks are stored – so this is where you’ll go to empty them.
Fresh Water Tank
Your fresh water tank is going to be one of the most important purchases you make. As the name suggests, the tank holds fresh water and will give you a supply of safe drinking water as you travel. Although it isn’t wise to rely entirely on your fresh water tank to supply you with drinking water, it’s still vital to have. If you’re traveling away from a camping site and you don’t have access to a fresh water supply for a while, you’ll have to rely on your water tank supply to keep you hydrated.
It’s the first of three water tanks you’ll require for your RV (we’ll explain about the other two a little later).
They come in different sizes. Which size you need depends on the class of the vehicle that you have:
- Class A – This is the largest size, about the size of the bus. Obviously, if you’re traveling with a vehicle this size, you might have more passengers, and will, therefore, need access to more water. The usual size of fresh water tank for a Class A vehicle is around 75-100 gallons.
- Class B – This is actually the smallest size. Class B vehicles are usually the size of a van. Therefore, they require a much smaller tank – around 20-40 gallons.
- Class C – The size of a Class C vehicle sits neatly between a Class A and a Class B. The size of the tank you’ll require is around 35-60 gallons.
You can also get a fresh water tank for a travel trailer – these are usually around 30-50 gallons, although some are much smaller.
So how do you decide which size to buy?
It will really depend on the size of your RV and where you plan to store the tank. Most RVs have a dedicated space for the water tank, so you’ll need to measure the area and then check the measurements of the tank you’re looking at.
It’s tempting to get the smallest tank possible to make more room – however, you may end up relying on that fresh water, so it’s best to make sure you have plenty to go around.
On the flip side, you might decide that buying the largest tank is the best idea – but the only downside of that is the weight it will add to your RV, which will have an impact on the amount of fuel you have to use.
The average person on a camping trip will use about six gallons of water a day. This should help you to work out how much water you’ll use a day if there are more of you. You won’t be able to rely on your fresh water tank for extended periods of time – you’ll have to use your inlet hose to connect you to a water supply.
Technically, the water stored in your tank will stay safe for up to six months – however, most people advise replacing it after 2-4 weeks.
Filling Your Fresh Water Tank
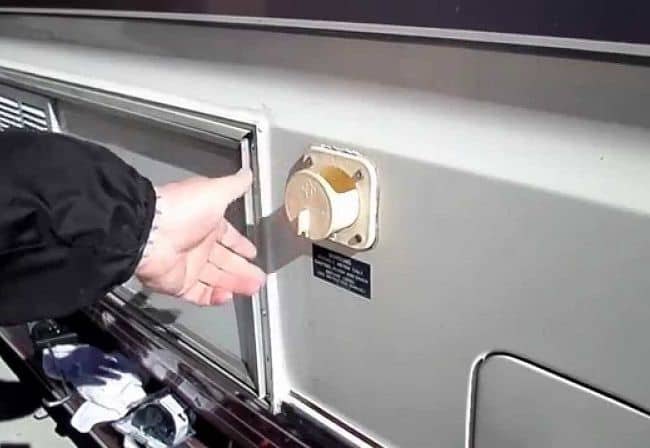
You’ll need to fill your fresh water tank before you go, and you’ll need to top it up periodically as you travel. There will be a connection on your tank, which will allow you to connect a hose and fill it up from a water source. Campsites and parks will have fresh water sources that you can connect to. You may also have a city water connection on your tank for connecting to a city water source. It’s important not to run your water pump at the same time, as this could damage your plumbing.
It goes without saying, but make sure you use clean water hoses that are never used for your gray or black water tanks, and make sure that the source of water you choose is safe for drinking.
Emptying Your Fresh Water Tank
What goes in must come out, right? You will need to empty your fresh water tank from time to time – you may need to clean it, or you might want to replace it with fresh water, or you may have arrived home after a long trip and wish to empty your water tank before it goes stale.
Whatever the reason: emptying your tank is pretty simple. The drain will be on the bottom of your RV – and you can simply empty it out onto the ground.
Maintaining Your Fresh Water Tank
You need to sanitize your fresh water tank – this is very important for your health. Mix water and bleach at a ratio of one cup of bleach to a gallon of water. Using a funnel, pour in the bleach and water solution and then fill your tank with water. Then, you have to switch on your water pump and turn on every tap and shower until you start to smell chlorine.
At this stage, you can let that water sit there for 8-24 hours. You can agitate the water in the tank by driving around a little bit during this time (if you can find a bumpy road, that will help). Then you have to drain your tank, filling it with fresh water and flushing it out multiple times until the bleach smell has completely gone.
Finally, you’ll have to switch on the water pump again, running all the taps until there is absolutely no trace of a chlorine smell. If you’re unsure, keep rinsing – and you’ll have a nice, clean, and safe tank.
RV Water Pump
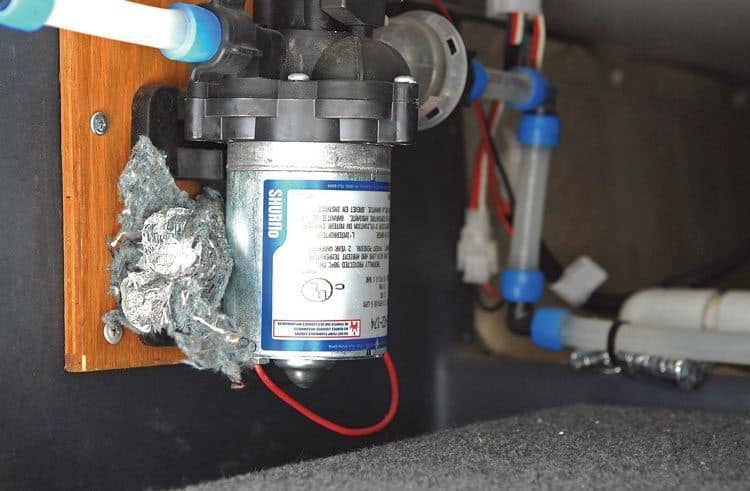
The next vital piece of equipment you’ll need is a water pump. A 12-volt water pump creates pressure, which distributes water through the system. If you’ve ever had issues with water pressure, you’ll know how annoying it is when you’re trying to have a shower under a dribble of water, or if you’re running the tap and it bursts out at full throttle. A water pump will prevent these situations from happening.
You can buy solar-powered water pumps – however, by far the most common is the electric 12-volt kind. They can vary quite a lot in their power and pressure, however. You can measure this using ‘gallons per minute’. The higher the number, the faster it can push water through the pipes where it needs to go.
Some of the most popular brands include Shurflo, Seaflo, and Flojet.
Installing a Water Pump
It may look complicated, but installing a water pump can be pretty straightforward. They’re usually stored neatly out of the way, like under the bed, under the sinks, or in the basement area. Attaching them will involve switching off the power to your RV, and then following the manufacturer’s instructions, and it’s normally simple to figure out.
Maintaining Your Water Pump
You can take a few simple steps to maintain your water pump. One key thing to do is to check your water pump strainer. Usually located to a hose that runs into the pump, the strainer can get clogged and grimy over time, which will impact your water supply.
Make sure this is clear and free from debris. You can also check it every now and then to make sure the vibrations from driving haven’t loosened any of the components.

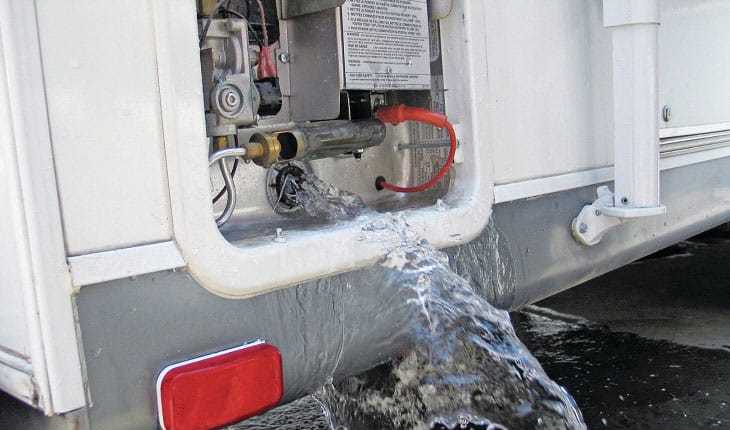
RV Water Heater
As the name suggests, this is essential if you want hot water in your RV. A hot water heater usually has a cold-water inlet on the side and a hot water outlet on the top. They have to be safety approved and usually come with a pressure-relief valve and temperature control. There are a few different kinds:
Gas
A gas-powered water heater will use liquid propane and a spark ignition system.
Electric/Liquid Propane
These use a combination of electricity and liquid propane to run. These work pretty quickly, heating up the water fast when you need it.
Motor Aid
This allows you to heat water using the heat produced by the engine as you drive. This is great for making use of a resource that would otherwise be wasted. However, it quickly cools down once you’ve stopped traveling, so you’ll have to make the most of your hot water while you have it.
Tankless
You can also get tankless water heating systems for an RV. This is obviously great for space-saving, as a water heater can take up a good chunk of space in your RV. They do tend to be more expensive than the traditional models, however.
Water heaters vary in how quickly they can heat your water – the faster they work, the more expensive they tend to be.
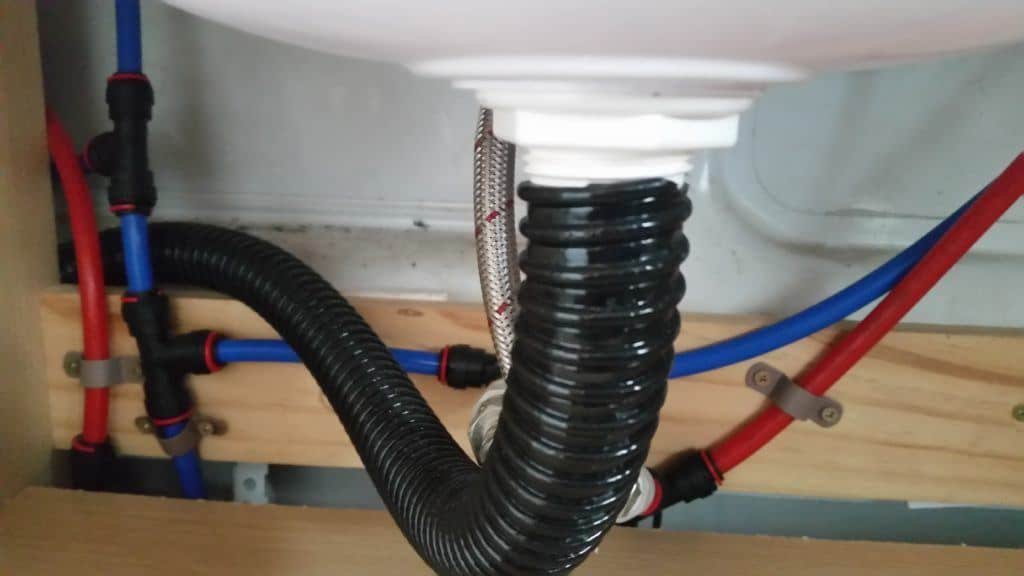
Drains and Pipes
Pipes allow water to flow through your RV to the correct outlets. Drains, obviously, allow the used water to drain away to the correct place (which will either be your gray water tank or your black tank). These are vital but pretty self-explanatory.
You may find yourself coming across clogged drains from time to time. Don’t be tempted to use the same cleaners that you would at home – these are far too harsh for an RV plumbing system. Instead, you’ll need to use RV-safe cleaning solutions (and a pair of gloves, and a bit of elbow grease to remove that tangle of hair from your shower drain).
Gray and Black Tanks
These are essentials, and they serve slightly different purposes.
Gray Tank
A vital component of an RV plumbing system, your gray tank (otherwise known as a holding tank) is the final destination for any water that doesn’t come from the toilet. Anything from showering to washing the dishes will create wastewater, which, of course, has to go somewhere.
You need to make sure that you don’t allow small particles of food, like rice, to go down the drain too often. Obviously, mistakes happen, but the gray tank drain can become clogged quite quickly, so it’s best to keep it free from food if you can.
Black Water Tank
Your black tank, meanwhile, stores all the waste from the toilet. This is the least glamorous part of camping life – but it’s so important that you get this part right. For water-safety reasons, it’s important not to mix up your hoses – keep your freshwater tank hose and your waste tank hose separate (and clearly marked).
Tank Size
When it comes to tank size, again, it will depend on the amount of space you have and the number of people staying in your RV. The bigger the tank, the greater the capacity – but as it fills up, it will become heavier and heavier, impacting the amount of gas you’ll use when you’re driving.
If you’re planning on traveling for long distances between campgrounds, then a larger tank has obvious advantages. Similarly, if there are a lot of you staying in your RV, you’ll have to get a bigger tank, as even three or four people can produce a surprising amount of wastewater. If there is just one or two of you, you can probably get away with a slightly smaller tank.
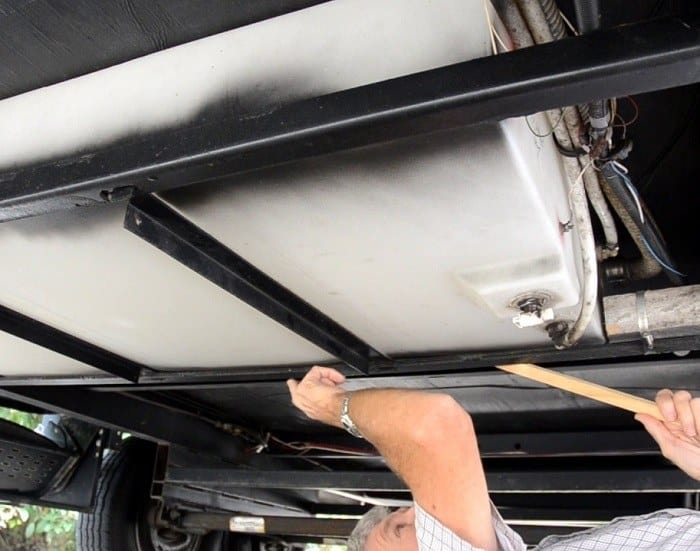
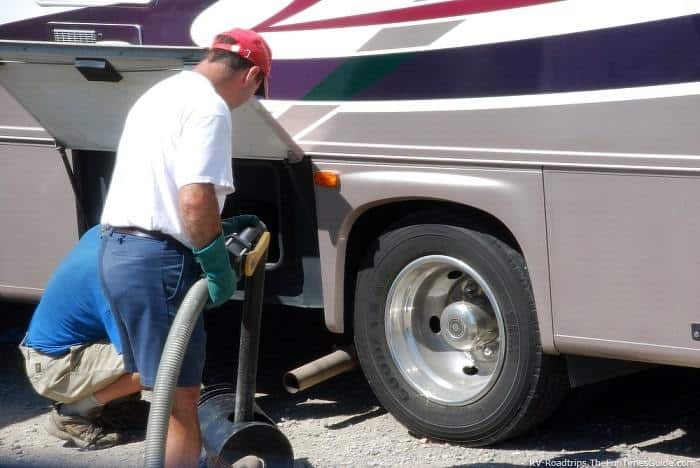
Emptying Your Tanks
It’s best to wait until your tanks are around two thirds full before you empty them. This prevents the tanks from getting clogged, allowing everything to flow out properly. Some tanks have a sensor that can tell you when your tank is getting full – these can fail, however.
It’s always best to remember when you last emptied your tank, so you can predict when it will need emptying again. Campsites have dumping stations, and they should be clearly marked so you can empty your waste into the appropriate places.
A word of caution – always wears gloves during this process! (This sounds obvious, but you do not want to be without gloves in this situation).
The valves should be clearly marked on the outside of your RV. Attach one end of the sewer hose to the valve, and the other end to the valve on the dumping station.
Starting with the black tank, pull the valve and allow the tank to drain. Eventually, the noise of liquid flowing through the hose will stop – that is the point at which you close the valve. Make sure it is completely shut! If you don’t close it, the liquid will flow out, and the solids will have no way of draining out.hen you can empty your gray tank valve in the same way.
It is important to do it in this order to allow the water from the gray tank to flush away any solids from the black tank that may be stuck in the hose.
Be careful when you detach the hose, in case anything is still stuck in there. It’s better to store the hose in some kind of box with a lid for hygiene reasons.
Maintaining Your Tanks
Your tanks will need maintenance to keep them working correctly. You will have to purchase black tank chemicals – these remove odors from the tank as well as helping to break down the solid waste. They are an essential item – so make sure you always have some to hand, following the instructions on the packaging.
Sometimes they will require deep cleaning. Your gray tank can be cleaned in the same way as your freshwater tank – by mixing bleach and water (about two cups of bleach for about a three-quarter-full gray tank). You can then let this sit for ten minutes or so before flushing the whole thing through until the bleach smell has completely gone. This is a great way of removing any food debris.
The black tank, meanwhile, can be cleaned using the rinse valve – this is a simple process of flushing the tank through with water, removing any clogged tissue or solids that may be accumulating in the tank. If your tank does not have a rinse valve, you can buy an aftermarket flush valve – but you’ll have to be sure it matches your tank.
To Macerate or Not to Macerate?
You can buy a macerator (although some models of toilets will come with a macerator pre-installed). They’re normally electric-powered, and they turn anything that goes into your black tank into a slurry, making the draining process a bit neater. They can be expensive to buy, and some people find that the use of a macerator actually increases blockages – so it’s really a personal decision.
Fixtures
The next important thing to consider is your fixtures, and this is the part that people tend to enjoy shopping for the most.
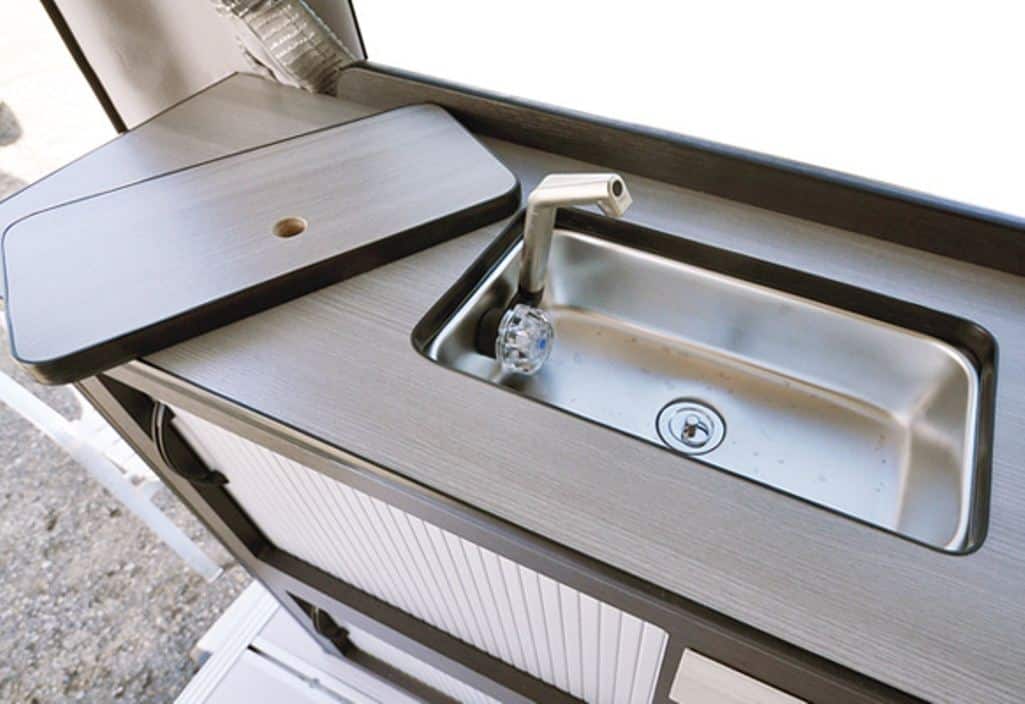
Kitchen Sink
The kind of sink you buy depends on the space you have available in your RV. You can buy them in different shapes, sizes, and colors. They come at different price points – so you should be able to find something, even if you’re on a very tight budget.
You could go for a shiny chrome sink if the modern look is what you’re after. Or, if you have a vintage RV, you might prefer something that will blend in a little more. They’re usually made from stainless steel or plastic – stainless steel will last a little longer, but plastic fittings tends to be a bit cheaper.
Obviously, you’ll have to measure the space in your RV to decide what kind of sink you want to buy. You can buy a round sink with a lid – this can be closed to create more workspace when you’re not using the faucets. Or, you can go for a more traditional sink that looks like the kind you’d have at home. If there are a few of you traveling together, you may want a bigger sink, as you’ll be producing more dishes to wash!
You can also buy sinks that have hob burners attached to them – again, if space is tight, this could be a neat solution.
Bathroom Sink
The bathroom sink is another essential. You can buy them in different shapes and sizes – space tends to be at a premium in RV bathrooms, so you’ll want something pretty small to ensure you can fit comfortably in your bathroom.
Depending on your budget, you can create a bathroom in your RV that looks just like the one you have at home. Porcelain toilets and sinks create that true ‘home comfort’ feel. However, these obviously add to the weight of your RV.
You may be tempted to have just one bathroom sink in your RV. However, it’s far more hygienic to have a sink in your bathroom as it saves you walking through your RV with unwashed hands after using the toilet. Also, it’s easier and neater to have your toothbrushes in the bathroom, keeping your toiletries and the kitchen area separate.
You can buy corner sinks, pedestal sinks, or sinks that are wall-mounted. Really, this is down to personal preference.
Toilet
When it comes to toilets, you’ve got a decision to make! A toilet may not seem like a glamorous purchase, but it’s a vital one. Again, they vary in sizes, heights, and price – you could find yourself spending as little as a couple of hundred dollars on a toilet, or as much as a thousand dollars.
There are a few different types of toilet you can buy for an RV:
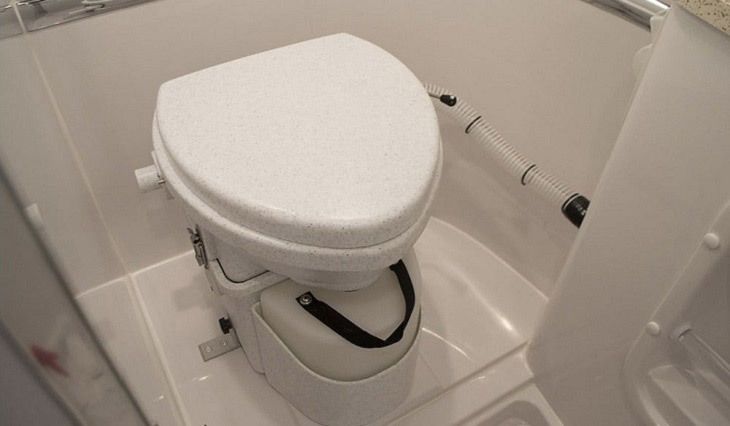
Traditional RV Toilet: These look just like the kind you have at home. You can even buy a porcelain one if you want a bit of extra luxury. The waste goes from the toilet into a black tank and is flushed away using a button or a foot pedal.
Cassette Toilet: A cassette toilet looks very similar to a traditional RV toilet, but instead of a black tank at the bottom, the waste goes into a small tank which has to be emptied by hand.
Porta Potti/Chemical Toilet: a chemical toilet is self-contained, with its own RV chemical tank at the bottom. The bottom half can be easily removed so you can empty the waste. They’re great for smaller campers or RVs, as they take up little room, and they’re a bit more portable than the other kinds, meaning you can move it to a different location if you need to.
Composting Toilet: these are quite different from the other types on this list. Liquid and solid waste are separated into different places – the liquid waste goes into a small tank which can be emptied by hand, and the solid waste goes into a container, to which you add composting material. You can then empty the solids into your regular trash.
A word of note – it’s best not to use regular toilet paper in an RV toilet. You’ll want to use quick-dissolving toilet paper instead, as this is much kinder on your black tank, and a blockage is the last thing you want to be dealing with
Shower
It goes without saying that you’ll need a shower in your RV. It’s really important to conserve water – the type of shower that you choose can prevent you from wasting too much of it.
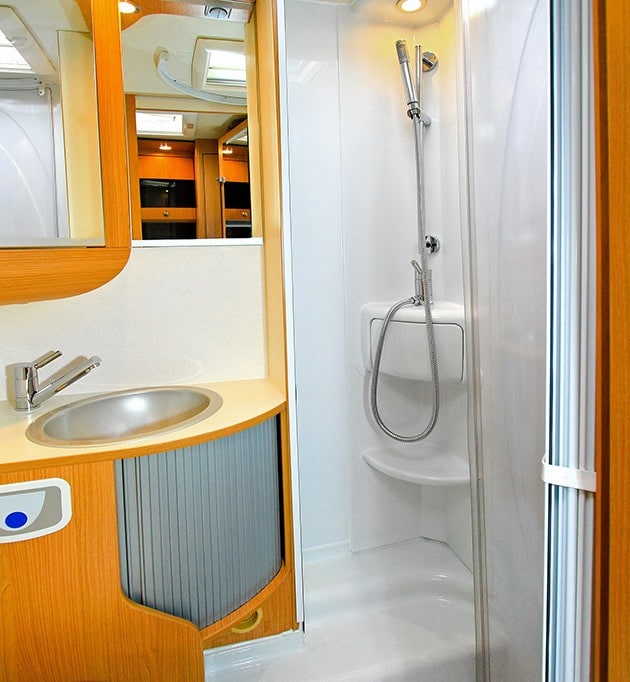
The shower will consist of the shower enclosure (the place where you stand), and the showerhead itself (which usually come with a shower hose included in the price). Showerheads can vary greatly in how powerful they are and how much they cost. They can come with different pulse settings – so if you want a power shower after a long hike, you can change the settings to reflect that.
Make sure you lookout for a shower head with a rubber grip, enabling you to keep hold of it if you need to move it around. You also might consider whether you need an adjustable arm – this is great if you have family members of varying heights.
Some companies are great at improving efficiency when it comes to water use. They utilize devices which mix oxygen with water – this helps to create strong pressure without wasting a lot of water. This is important for environmental reasons, but it’s also important if you’re away from a water supply and have to rely on your freshwater tank.
You’ll have to get used to showering differently in your RV – it’s best to shower quickly if you can, to prevent wasting water.
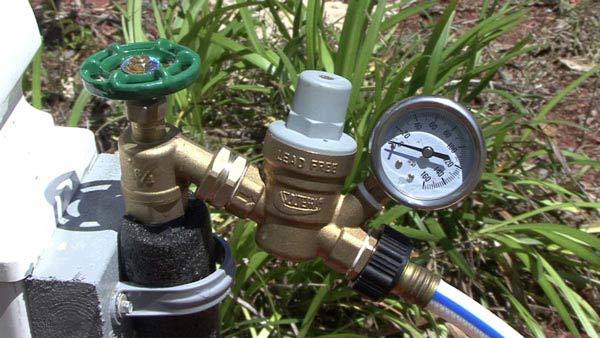
Water Pressure Regulator and Water Pressure Gauge
To help your pump to distribute water effectively, you may consider buying a water pressure regulator.
When you connect your RV to a water supply, like at a campground, you may not be expecting how high the water pressure is. If you don’t try and regulate the water pressure, it can damage the RV plumbing systems.
A water pressure gauge helps you to measure the campground’s PSI (pounds per square inch). If it’s higher than the recommended water pressure for your RV, then you know you need an RV water pressure regulator.
A pressure regulator looks like a small pipe, and it acts as a kind of filter between the campground water supply and your RV’s water hose. They will either be adjustable or non-adjustable.
Adjustable models allow you to change the water depending on your needs. You may need a little more pressure in the shower than you would when washing the dishes, for instance.
Non-adjustable models set the water pressure at one level. They also don’t come with a gauge attached. Many people prefer the adjustable kind, although they do tend to be more expensive.
Other Items You’ll Need
There are a few other items that you may consider buying:
Water Tank Filter
You may consider installing a filtration system for your drinking water. This can purify your water, giving you extra peace of mind. You could buy a water filter for your kitchen tap – this is a small piece of equipment that will help you to keep your drinking water extra clean.
However, if you want to filter all the water in your RV, you could buy a filter that is attached to the hose. They use carbon filtration to filter the water. They don’t tend to last that long, so are perhaps better suited to those who occasionally use their RV.
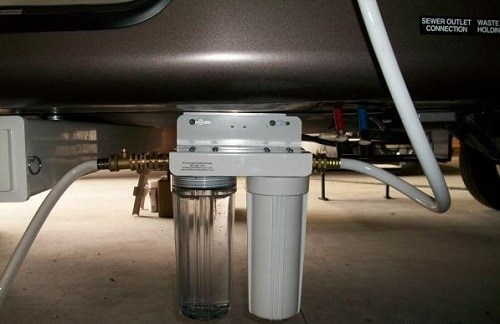
If you want something a bit more powerful, a canister system can work really well. They work by attaching one or more canisters to the side of your RV – these can be used to remove strong odors or tastes from your water and can effectively remove any sediment present in your water supply.
Drinking-Water Freshener
In a pinch, drinking water freshener can be a handy thing to have around. You can add it to your water tank to remove odors and keep the water tasting ‘fresh.’
Jug and Funnel
It sounds simple enough, but a plastic water jug with a lid is a great thing to have around (you can buy a water filter jug too if you’d like). When you’re at a campground, you can refill it and take it on the road with you, thus giving you an extra supply of fresh drinking water.
A funnel is also very useful for a variety of tasks, including cleaning drains and sinks.
Baking Soda
This sounds like a strange thing to include, but baking soda is an RV essential! You can’t use regular cleaning products in an RV, so baking soda is a great gentle alternative. You can use it to clear your drain of blockages, keep your sinks smelling fresh, and deodorize your water tanks.
Water-Saving Ideas
As we mentioned earlier, it’s incredibly important to save water when you’re in an RV, especially if you’re relying on your freshwater tank for a while. Here are a few ideas to cut down on your water consumption:
- Adapt to your lifestyle. This is the first, and most simple, step. You could take quicker showers, for example. Or get used to reusing your cups and glasses instead of using them once and washing them. You can also make sure you never waste water by running it down the drain. If, for example, you’re waiting for the water to heat up, then you can collect the spare water in a container to use later.
- Choose your faucets and showerhead wisely. Some models are more efficient than others when it comes to wasting water. Simply upgrading your showerhead could save you a lot of water.
- Upgrade your water pump. If you have an old and inefficient water pump, you could be wasting a tremendous amount of water. Buying a newer, smarter version could make a huge difference to your water consumption.
- Install a graywater system. If you really want to be environmentally friendly, you could consider installing a graywater system. It allows you to use water from sinks and the shower to flush your toilet.
- Choose a composting toilet. A composting toilet is a ‘dry’ toilet, requiring no water at all for flushing. Over time, this will save you from using a lot of water.
Winterizing Your RV
One final thing to consider is how you will protect your RV plumbing from the elements. If you’ve come to the end of the camping season, there are a few things you need to do.
Firstly, you’ll need to drain your water tank. You should also drain and flush your gray and black tanks. Then you’ll need to open all the water faucets in your RV and flush the toilet, to ensure all the water is gone. If you wish, you can use a compressed air adaptor to blow out any remaining water from the water lines – check online to see an in-depth tutorial on this.
Once you’re sure all the water is gone, you can add antifreeze. This is a lengthy process that will require a bit of practice. However, it’s necessary in order to protect your tanks and pipes from freezing. You will then be able to empty your water heater, too.
This may take a little while, but it’s essential to protect your RV from the cold weather.
Frequently Asked Questions
Question: Is dumping your gray tank and blank tank easy?
Answer: Once you get the hang of dumping your tanks, it is super easy to do—even though it is still stinky.
Question: Should you close your black and gray tanks between dumps?
Answer: Yes. You should close your black and gray tanks between dump station visits.
Question: Can you use baking soda to clean out your sink?
Answer: Yes. Baking soda is a gentle cleaner and is recommended for cleaning out sink blockages.
Conclusion
We hope this has helped you to figure out the essentials of RV plumbing. Emptying and cleaning tanks and dealing with clogged drains is probably the least exciting part of camping. However, by understanding how it all works and maintaining it properly, you shouldn’t run into too many problems. If you do, at least you know how to deal with it – and it’s all part of the adventure!
RV Rental Services We Recommend:

Save up to 25% on your 2021 travel costs by booking an RV through RVshare (Valid until December 31st 2021). RVshare is the world’s first and largest peer-to-peer RV rental marketplace, serving more than 60,000 RV owners across the US.

Outdoorsy is safe, easy, fully insured, and has a great local selection. They're free to join and have no membership fees of any kind. Discover amazing RVs to travel in - or rent out your own!